
 USD
USD

How to Make a Template for a Hair System
Posted by Santana Fell on Apr 01, 2026
If you are new to hair systems and trying to navigate this whole new world of men's hairpieces, we know it can be completely overwhelming. That is why Superhairpieces is here to help you understand everything along the way.
All we can tell you is to take it one step at a time and trust the process to regain a full head of hair that looks and feels like your own.
Today, we will walk you through what a template is, why you need to make a template before you cut the base of your hair system, and how to cut your template to match the size of your balding scalp.
What is a hair system template?

A hair system template, also called a scalp mold or base template, is a physical form of your scalp’s bald area, showing its exact shape, size, and dimensions. It is used to cut the base of your hair system to your customized fit.
Think of a hair system template as the foundation of a perfectly fitting hair replacement system. Without an accurate template, even the best, highest-quality hair system will not look natural or sit evenly on your head.
Why do you need a template for your hair system?
A hair system template is essential to create a precise, customized, and comfortable fit that matches an individual’s unique head shape and hair loss pattern. It serves as a blueprint for accurately trimming hair systems, ensuring the base fits the contours perfectly and matches the desired hairline.
A good template is the difference between a hair system that looks like it grew there and one that looks like it was placed there.
Key Reasons for a Hair System Template:
- To cut the base of your hair system to match the template, or send it to your hair system supplier so they can cut the base material (lace, mono, or skin) for you.
- Sending the template to your supplier for a custom-made hair system order
- Everyone’s head shape and balding pattern are different. A template ensures your hair system base is cut to the exact shape, size, and dimensions of your thinning hair or bald area, the contour of your scalp, etc so your hairpiece fits perfectly.
- Without a well-made hair system template, your hairpiece will either be too large, covering areas where you still have bio hair, or too small, leaving bald patches exposed. Even a few millimetres of inaccuracy affects how naturally your hair unit sits, how well the adhesive bonds, and how undetectable the hairline looks.
- The template defines where your front hairline should be. It shouldn’t be too low (looks unnatural) or too high (doesn’t frame your face well)
- Your template makes future orders easier, keeping your look consistent over time (until your balding area increases)
Things you'll need to make a template for your hair system:
- Saran wrap / Cling wrap or plastic wrap
- Clear adhesive tape
- A white china marker
- A black permanent marker
- Scissors
- A mirror
- A flat surface to trace onto white paper
- Someone to help (optional)
- Measuring tape
Step-by-step: How to make a template for a custom hair system order
Step 1: Prepare your scalp.

- Your skin should be bare and dry. Clean your scalp thoroughly with isopropyl alcohol or a scalp cleanser to remove oils or residue from existing hair system adhesive, such as wig tape or wig glue.
- Pull back any surrounding bio hair with a headband so your bald area or thinning zone is fully exposed.
Step 2: Measure your forehead

- Mark where the hairline starts. Typically, you can use the 4-finger measurement method, where you place 3-4 fingers starting at your eyebrows or the bridge of your nose and mark where they end. This is typically where your hairline should begin.
- Alternatively, you can just raise your eyebrows or scrunch your forehead and notice where the wrinkles end. That is where your hair should start.
Step 3: Cut out a long piece of Saran Wrap

- The clip wrap piece should be long enough to place on your scalp, going over the bald area against your scalp and coming down to your chin, so that it can be tied from both ends.
- It is crucial to tie the Saran Wrap at the chin so it does not move while you make markings on it.
- Tighten the wrap from front to back, ensuring there are no wrinkles or bubbles, and hold it taut. Any wrinkle will distort your template and affect how your hair unit fits.
Professional tip: Don’t pull too tightly because the Saran Wrap will stretch. You just need to pull enough to keep it in place. If you get it too snug, it will stretch and shrink when removed, leaving you with a smaller template that will not fit your balding area on top of your head well.
Step 4: Mark your hairline and boundaries
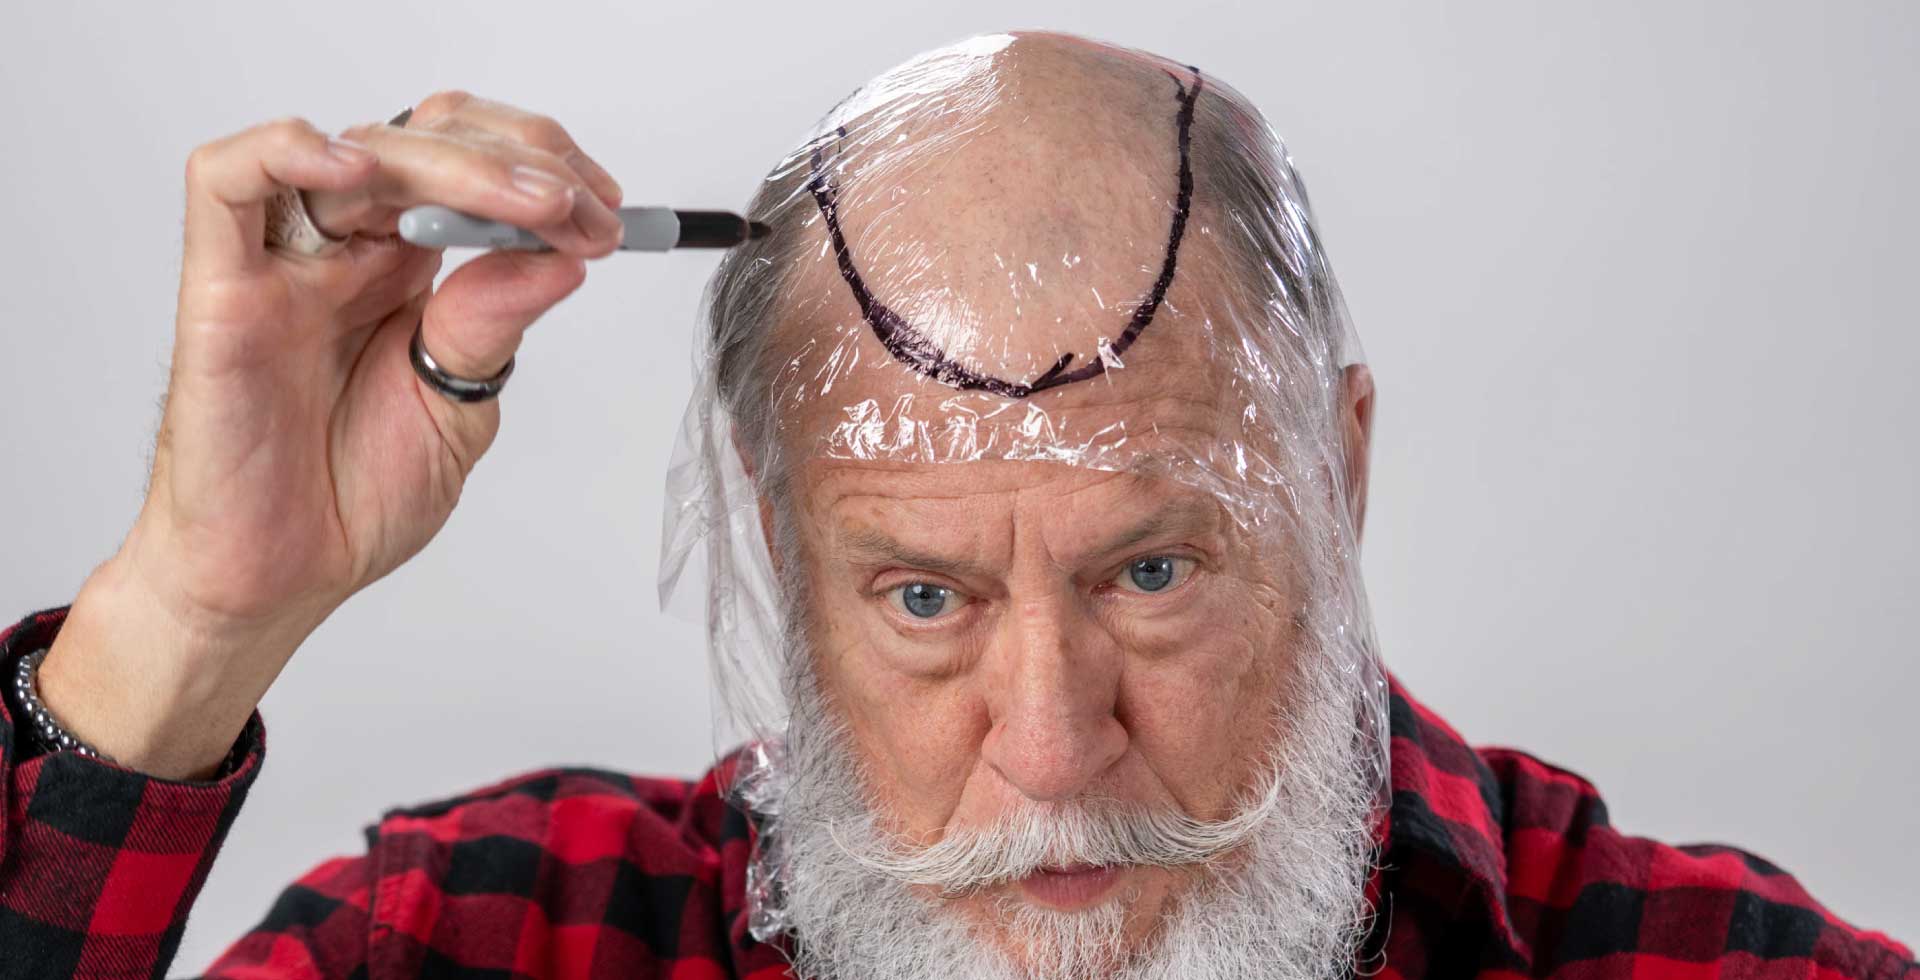
- Place your marker on top of the Saran Wrap exactly where you marked your hairline. Using a black permanent marker, draw your desired hairline at the front.
- Start marking the outline of your bald scalp, starting from the front hairline, following the natural boundary of your hair growth as closely as possible.
- Mark the sides and crown perimeter carefully. This defines the very edge of your hair system.
- Use a mirror to mark the back of your hairline.
Professional tip: Follow the outline of your own hairline and trace how it was when you had hair or how you want it to be in front - round, straight, etc.
Step 5: Secure with clear tape
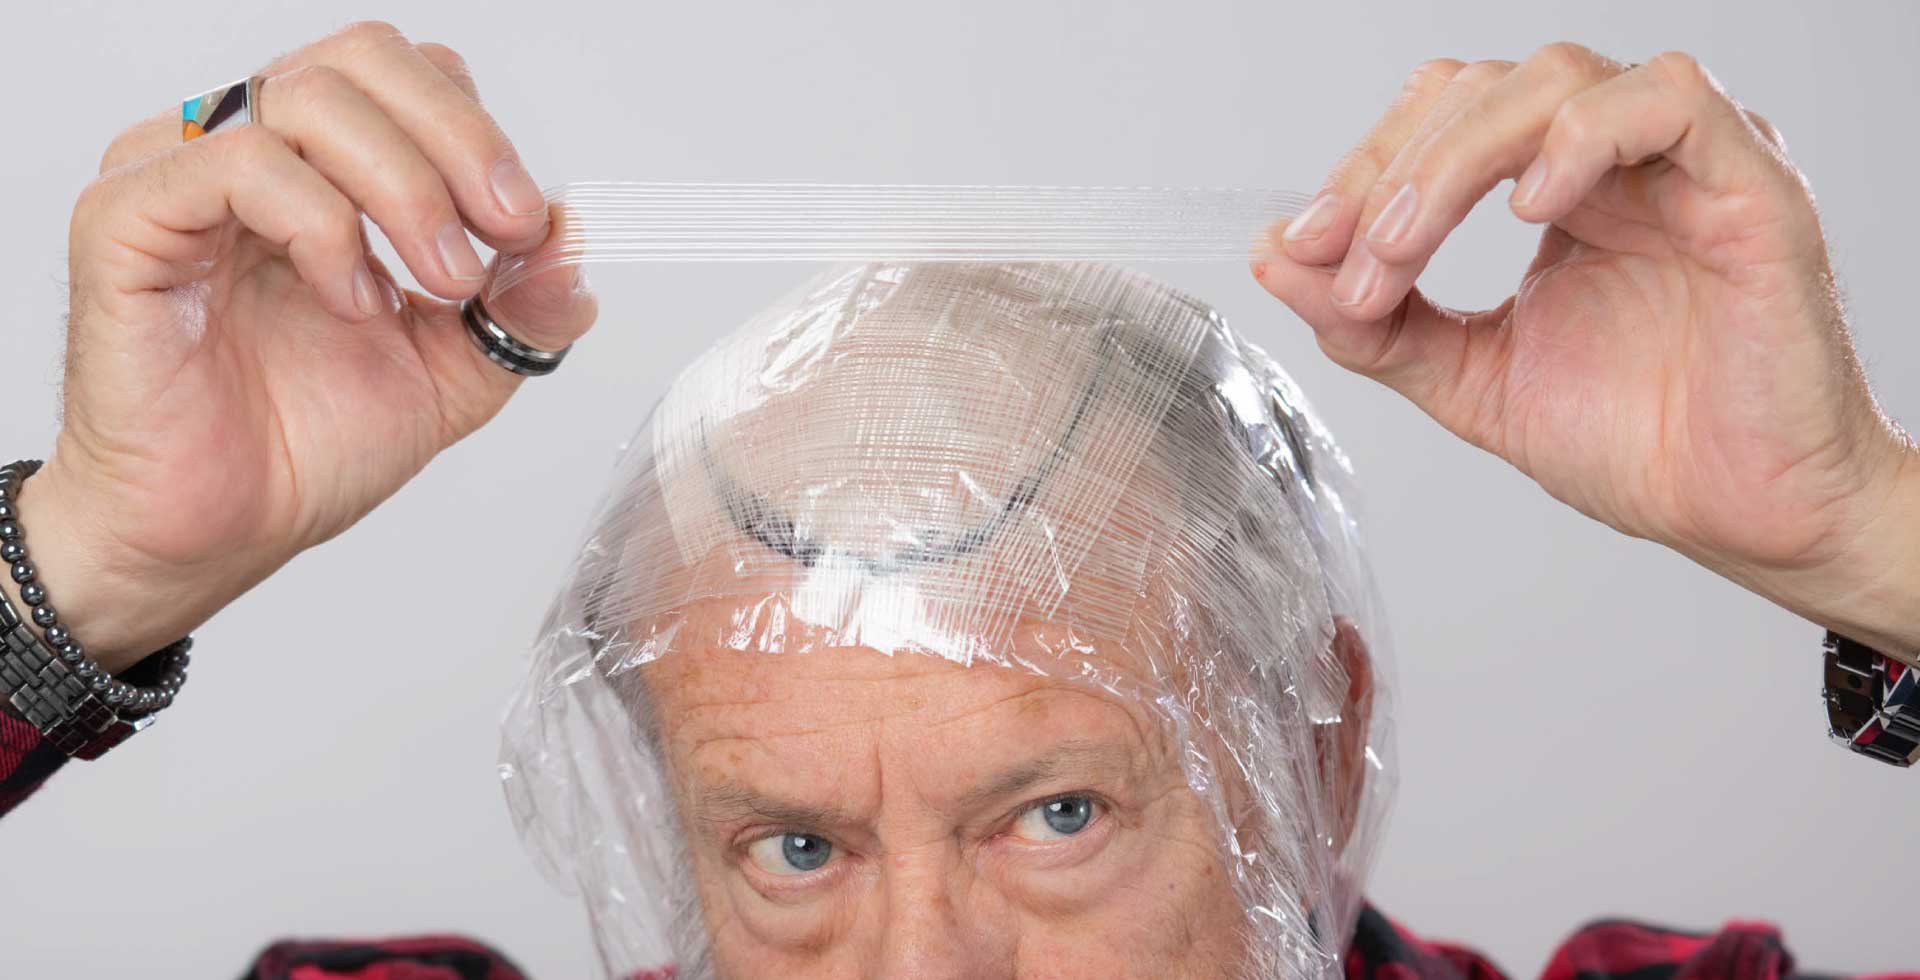
- Secure the Saran Wrap with clear tape across your scalp.
- Place the tape over the lines you have marked from one side to another.
- Layer another layer of clear tape over the cling wrap to create a firm, stable surface. Use enough strips to cover the full base area, overlapping slightly. This step turns the flexible wrap into a rigid template that holds its shape even after it's removed from your head. You can use as many layers of tape as you want to ensure the template is solid enough.
Professional tip: For best results, apply at least one horizontal layer and one vertical layer.
Step 6: Remove and cut the template
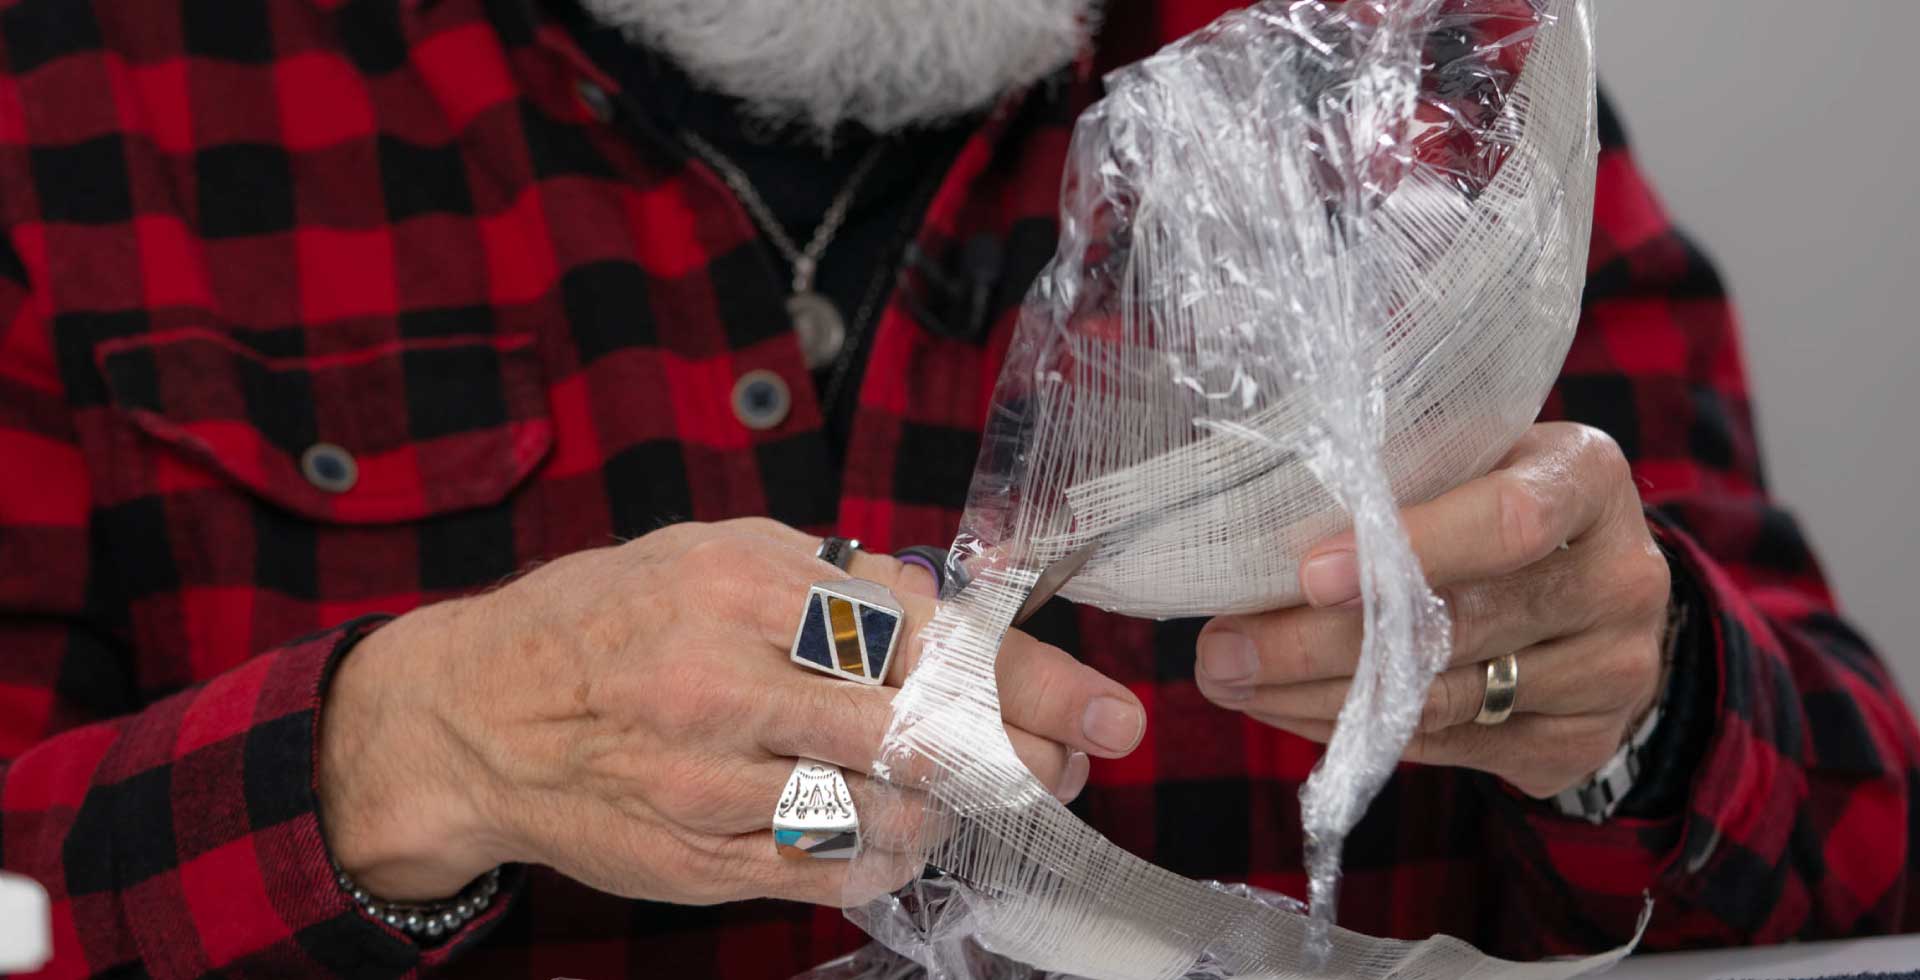
- Gently peel the cling wrap and tape mold off your scalp.
- Check that all edges are clearly marked.
- Cut along the marked line and trim away any excess cling wrap outside your marker lines.
- The shape left is your scalp mold, the exact outline of your hair system base cut, or a custom hair system order.
Professional tip:
- Mark the front (F) and back (B) of your template; you don’t want to mess up the measurements.
- Follow your hair recession and draw a line parallel to it. This is useful for a custom hair system where you want the front to be lace and the back to be poly or mono.
Step 7: Fit check
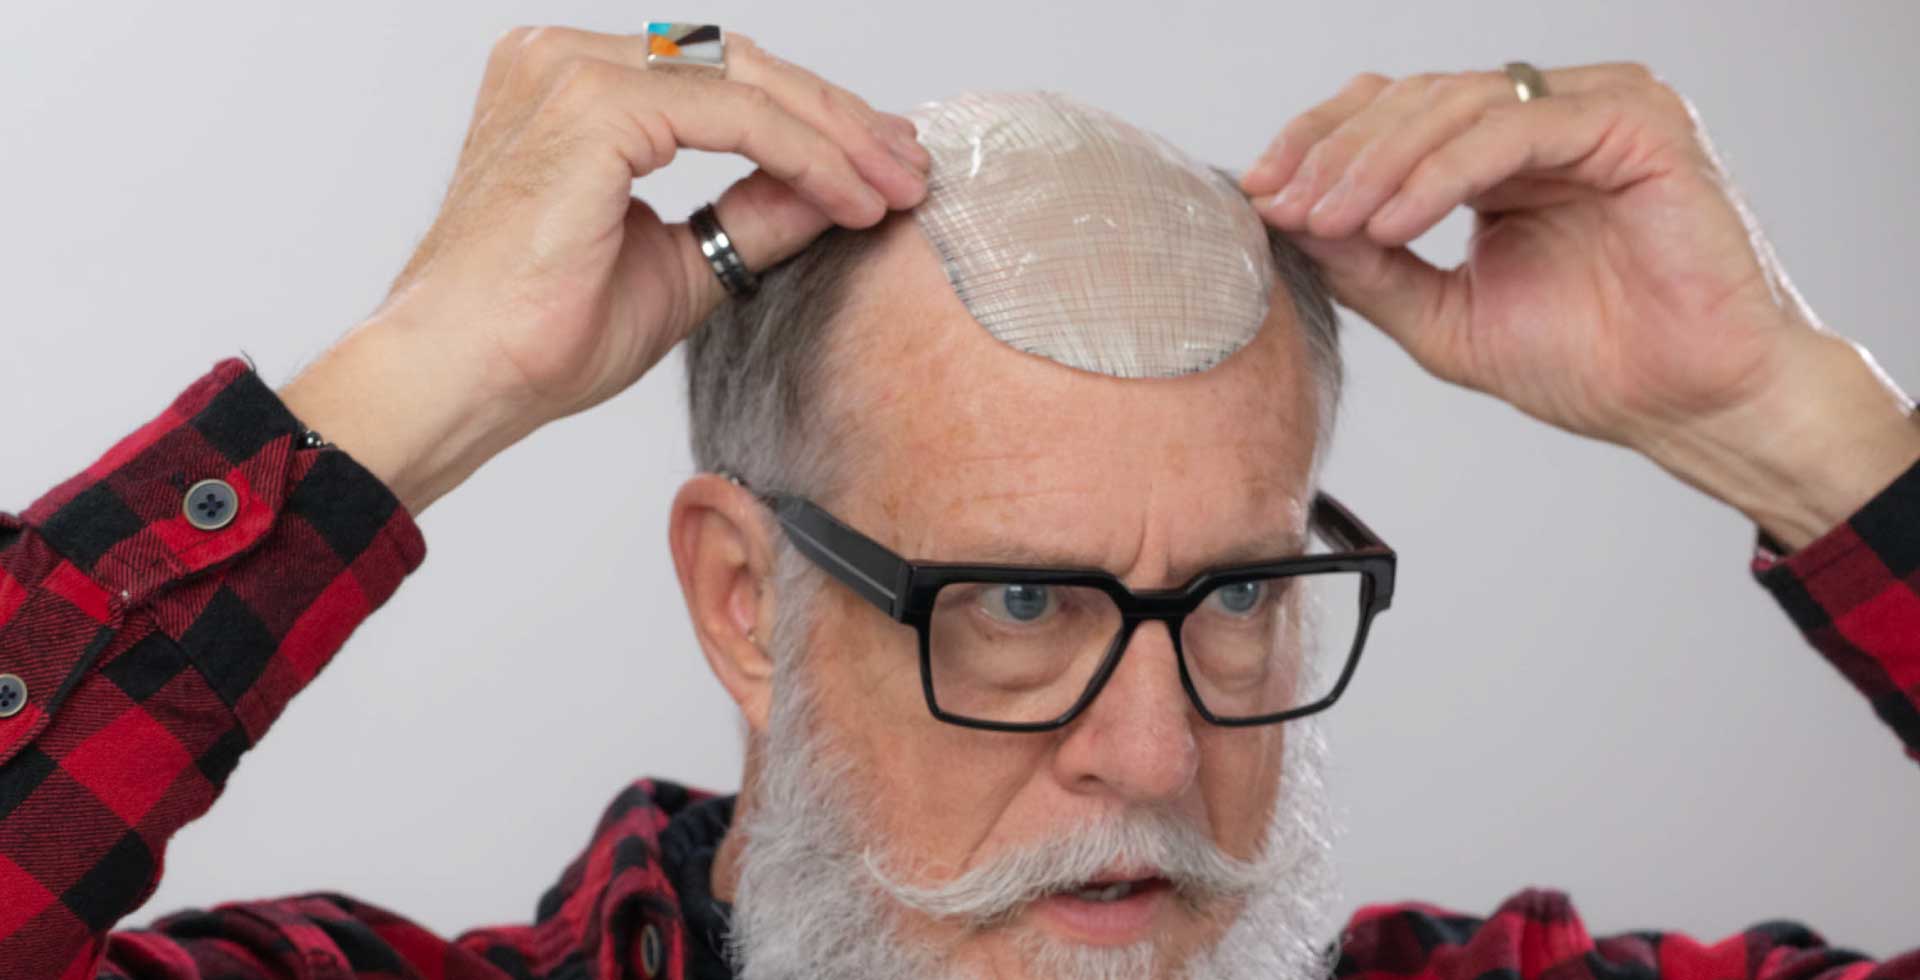
Place the template on your bald scalp and use a mirror to check if it's an ideal fit, covering the entire bald area. Make sure to check the front and back thoroughly.
Professional tip:
- The template should fit you just right, not too low on the front and definitely not overlapping the back, which would cause a lot of problems with the system.
- If you feel you have not cut the template well or messed up the measurements, redo the template to ensure the best-fitting hair system.
Step 8: Measure the template and your scalp
Using a measuring tape, measure the length and width of the traced shape at its widest and longest points. Record both. Then measure your bald scalp in the same way and see if both the numbers match.
Read: How To Measure Your Bald Spot For A Men’s Hair System
Step 9: Cut the base or send the template to your supplier
Once you are comfortable with the fit, you can use the hair system template to cut the base of your hairpiece, or send the template to Superhairpieces for a custom hair system for men.
Alternatively, you can send your template and get a base cut from hair system professionals at Superhairpieces.
What are the best tips for creating a hair system template for a custom order?
If you want to use an easier method, you can try Superhairpieces Fast Molds for a quick template for your custom men’s hair system order.
What is a Fast Mold/ Quick Template?
Fast Molds or Quick Templates are ready-made templates or clear caps that simplify custom ordering. We have three sets of six molds, totalling 18 cap templates, offering a variety of options for our men's hair club. These fast molds come in three different contour levels: deep, medium, and shallow, with multiple markings to help you determine the right fit for the balding area on the top of your head.
All you need to do is simply place the fast mold on your scalp and see which lines coordinate with the bald area you want to conceal. Then, put these letters and numbers on the custom order form to create your custom-made template for the best hair system for men.
Read: Learn how to use a fast mold
Common mistakes to avoid when creating your template for a hair system
Not marking the front hairline clearly: If the hairline edge is not marked with a firm, clean line, your manufacturer will estimate, and a guessed hairline rarely looks natural on a finished hair replacement system.
Using too little tape to stiffen the template: A floppy cling-wrap template will shift when removed, resulting in an inaccurate shape. Use enough clear tape so the template holds its exact curve off the scalp.
Sending only a digital photo instead of a physical template: Photos distort proportions due to lens angle and camera distance. For a truly custom hair system, always send the physical scalp mold alongside any reference images.
Ignoring the crown and temporal areas: Hair loss patterns for alopecia and male pattern baldness often include the crown and temples. An incomplete template leads to a hair unit that leaves patches exposed.
Frequently Asked Questions
How often do I need to make a new template?
If your hair-loss pattern is stable, your template will remain accurate across multiple orders. If your hair loss is progressing, as is common with alopecia areata or androgenetic alopecia, re-measure before each new hair unit order.
Can my hair system salon make the template for me?
Yes. Many non-surgical hair replacement salons offer professional templating as part of their fitting service. This is especially recommended for first-time wearers who want expert guidance on hairline placement and base selection.
Is a template only needed for a custom hair system, or for stock units as well?
Templates are primarily used when ordering a custom hair system, where the base is cut specifically to your scalp shape and measurements. For stock hair systems, which come in standard sizes such as 8x10 inches, you do not need to send a template. Instead, you measure your bald area, order the closest standard size, and either cut the base yourself or have a stylist or hair system technician trim it to fit.
What is the difference between a custom hair system and a stock hair system?
A stock hair system is a pre-made hair unit manufactured in standard sizes and base shapes. It is ready to ship immediately and is more affordable, making it a good option for first-time wearers or those on a budget. A custom hair system is made entirely to your specifications: your template shape, your chosen base material (lace, mono, or skin), your hair colour, density, curl pattern, and hairline design. Custom units take longer to produce (typically 2-3 months) but deliver a far more precise, natural-looking fit.
Can I use measurements instead of a physical template?
You can provide measurements, length, and width of your bald area, but this only works well for rectangular or standard-shaped hair loss. For irregular bald spots, receding hairlines, or alopecia patches with uneven edges, measurements alone will not capture the true shape. A physical template or scalp mold is always more accurate and is strongly recommended for any custom hair system order.
How do I know if my template is accurate enough to send?
A good template should lie completely flat on your bald area of the scalp, have a clearly marked front hairline with no ambiguous edges, and show the full perimeter of your bald area in one continuous line. If any edges look smudged, torn, or unclear, remake that section before shipping.
Does the hair system supplier need anything else besides the template?
Yes. Along with your template, most custom hair system suppliers will ask for your hair colour (using their shade chart or a real hair sample), desired hair density (light, medium, or heavy), hair texture and wave pattern, base material preference (lace base, mono base, skin base, or hybrid), hair length, and your preferred attachment method (adhesive, tape, or clips). Some suppliers also ask for reference photos of your desired hairline and parting style. The more details you provide, the more accurately your hair unit will be made.
How long does it take to receive a custom hair system after sending the template?
Most custom hair system manufacturers take between 3 and 5 months from order confirmation to delivery, depending on their production schedule and your location. Rush orders are sometimes available for an additional fee, typically reducing production time to 8–12 weeks. Stock hair systems, by contrast, usually ship within 1–5 business days since no manufacturing is required.
Can children or people with full scalp alopecia use the same method?
Yes. The cling wrap and tape method works for all head shapes and sizes, including children and those with full scalp alopecia (alopecia universalis or alopecia totalis). For full scalp coverage, the template simply covers the entire top of the head rather than a partial area. In these cases, it is especially helpful to have a second person assist with the process to ensure the wrap sits smoothly and all edges are accurately marked.

 Likes
Likes


